首先,我們必須引用 UnityEngine.Events 命名空間。
1using UnityEngine.Events;
事件有 UnityEvent 與 event UnityAction 兩種寫法:
UnityEvent
UnityEvent 能顯示在檢查器 (Inspector) 中分成不帶參數和有帶參數的寫法,以下分別說明。
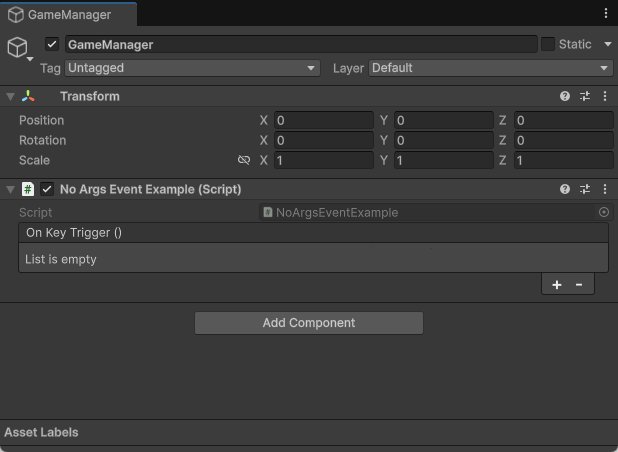
無參數事件
無參數的事件常常被用在點擊按鈕、碰撞或其它只需要「通知」,不需要傳遞任何資料的場合。
基本語法如下,先宣告一個公開 (Public) 的 onKeyTrigger 事件,我們示範一個按下空白鍵來觸發事件的功能。
1public UnityEvent onKeyTrigger;
回到編輯器,檢查器中就會出現一個新的欄位能直接操作,新增、拖曳物件到介面中來設定事件觸發時要做的工作,本文不會用到 (請參考:在檢查器中設定事件觸發的方法)。
另一方面,也可以用程式碼來監聽事件,在觸發事件時執行指定的方法。
1private void Start()
2{
3    onKeyTrigger.AddListener(CustomMethod);
4}
5
6private void CustomMethod()
7{
8    Debug.Log("Hi there!");
9}
如果不想要另外再宣告方法,也可以用 Lambda 的方式來寫。
1private void Start()
2{
3    onKeyTrigger.AddListener(() =>
4    {
5        Debug.Log("Bye!");
6    });
7}
最後,在偵測到按下空白鍵時,呼叫 onKeyTrigger 的 Invoke 即可觸發事件。
1private void Update()
2{
3    if (Input.GetKeyDown(KeyCode.Space))
4    {
5        onKeyTrigger.Invoke();
6    }
7}
有參數事件
有參數的事件會用在多個狀態要觸發同一事件的情境,例如:遊戲內有 10 個按鍵會觸發同一個事件,同時我們要知道現在觸發的是哪一個按鍵 (你不會宣告 10 個事件對吧?…對吧?)
用簡單點的例子來說明,鍵盤有上下左右的方向鍵,依據給它 1234 的編號,按下按鍵時觸發事件,同時要傳遞編號給方法,先宣告帶有一個整數參數的事件。
1public UnityEvent<int> onkeyTrigger;
在按下按鍵時,我們呼叫 CustomMethod 來顯示按鍵的 id。
請注意,這裡的 CustomMethod 有一個 int 參數。
1private void Start()
2{
3    onkeyTrigger.AddListener(CustomMethod);
4}
5
6private void CustomMethod(int id)
7{
8    Debug.Log(id);
9}
當然,我們也能用 Lambda 來做到相同效果。
1private void Start()
2{
3    onKeyTrigger.AddListener(id =>
4    {
5        Debug.Log(id);
6    });
7}
最後,在按下方向鍵時分別呼叫 onKeyTrigger 的 Invoke,並帶入 1234 的參數。
 1private void Update()
 2{
 3    if (Input.GetKeyDown(KeyCode.UpArrow))
 4    {
 5        onKeyTrigger.Invoke(1);
 6    }
 7    if (Input.GetKeyDown(KeyCode.DownArrow))
 8    {
 9        onKeyTrigger.Invoke(2);
10    }
11    if (Input.GetKeyDown(KeyCode.LeftArrow))
12    {
13        onKeyTrigger.Invoke(3);
14    }
15    if (Input.GetKeyDown(KeyCode.RightArrow))
16    {
17        onKeyTrigger.Invoke(4);
18    }
19}
event UnityAction
如果不會用到編輯器的介面,可以用 event UnityAction 的方法,語法會比較精簡。這同樣有分成不帶參數和有帶參數的寫法,我們用 UnityEvent 的寫法來改,以下分別簡要說明。
無參數事件
要用 event UnityAction 來取代 UnityEvent,這寫法比較精簡,在檢查器中也不會顯示任何介面。
1public event UnityAction onKeyTrigger;
改用 += 來新增要觸發的方法。
1private void Start()
2{
3    onKeyTrigger += CustomMethod;
4}
5
6private void CustomMethod()
7{
8    Debug.Log("Hi there!");
9}
同理,也能用 Lambda 實作。
1private void Start()
2{
3    onKeyTrigger += () =>
4    {
5        Debug.Log("Bye!");
6    };
7}
觸發事件的方式與 UnityEvent 一樣。
1private void Update()
2{
3    if (Input.GetKeyDown(KeyCode.Space))
4    {
5        onKeyTrigger.Invoke();
6    }
7}
有參數事件
有參數事件的概念和 UnityEvent 相同,只不過語法精簡且沒有檢查器的介面。
首先,一樣要宣告事件,同樣用於方向鍵編號的偵測。
1public event UnityAction<int> onKeyTrigger;
接下來要監聽事件,用 += 語法指定事件觸發時要呼叫的方法。
1private void Start()
2{
3    onKeyTrigger += CustomMethod;
4}
5
6private void CustomMethod(int id)
7{
8    Debug.Log("Hi there!");
9}
同理,也能用 Lambda 實作。
1private void Start()
2{
3    onKeyTrigger += id =>
4    {
5        Debug.Log(id);
6    };
7}
最後,觸發事件的方法與 UnityEvent 相同,直接呼叫 Invoke 並帶入編號參數即可。
 1private void Update()
 2{
 3    if (Input.GetKeyDown(KeyCode.UpArrow))
 4    {
 5        onKeyTrigger.Invoke(1);
 6    }
 7    if (Input.GetKeyDown(KeyCode.DownArrow))
 8    {
 9        onKeyTrigger.Invoke(2);
10    }
11    if (Input.GetKeyDown(KeyCode.LeftArrow))
12    {
13        onKeyTrigger.Invoke(3);
14    }
15    if (Input.GetKeyDown(KeyCode.RightArrow))
16    {
17        onKeyTrigger.Invoke(4);
18    }
19}
範例專案
本文所示範的內容皆已上傳至 GitHub:tedliou/unity-event-tutorial