前言
HID(Human Interface Device)直譯為人性化介面裝置,是一種定義電腦與輸入裝置通訊的標準,常應用於鍵盤、滑鼠或遊戲搖桿上。Unity 近年來推崇「Input System」作為遊戲的高階輸入系統,它本質上就是將處理 HID 封包的底層邏輯封裝起來,讓開發者能更輕鬆的整合各種輸入裝置。Input System 本身已支援多種常見的輸入裝置,若開發者想要使用尚未支援的裝置,仍可通過新增自訂 HID 裝置的方式來與實現整合。
本篇文章以有 20 年歷史的老物 Griffin PowerMate 為例,一步一步說明要如何整合尚未支援的 HID 裝置。
實作步驟
安裝 Input System
Input System 的推出主要是想取代舊有的 Input Manager,在撰寫程式碼時最大的差異應該非「事件」莫屬。舊有的 Input Manager 僅能於 Update() 中取得輸入狀態,需要撰寫冗長的 if 語法;新版的 Input System 則是使用 C# 的事件,在偵測到輸入後將直接透過事件呼叫對應的方法,能夠讓 Unity 開發更快速且更靈活。
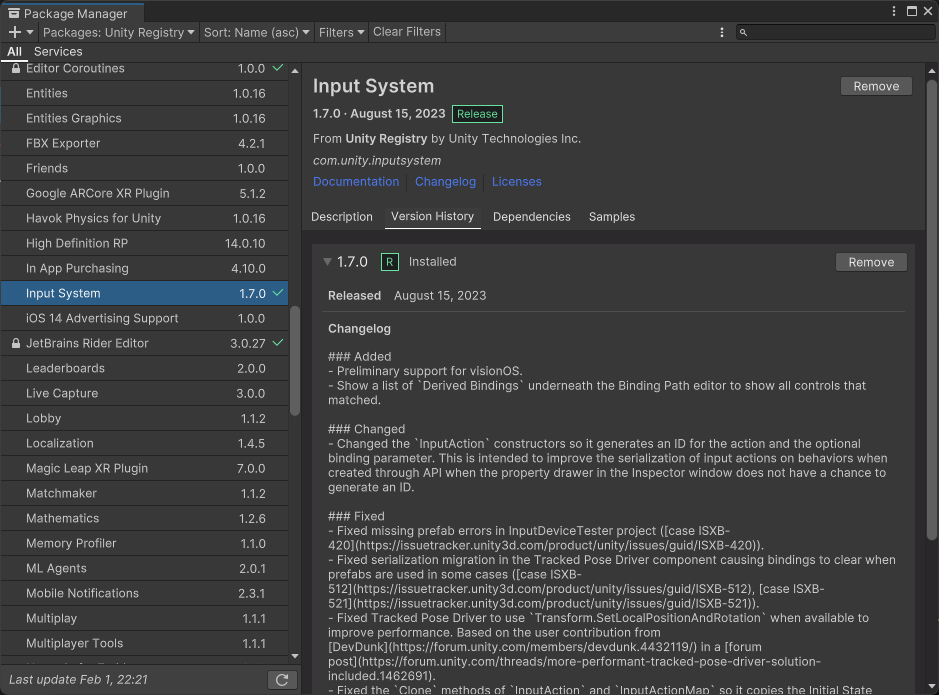
目前版本的 Input System 仍需由開發者來手動安裝。請開啟 Unity 專案,進入 Package Manager 中完成 Input System 的安裝。
啟用 Input System
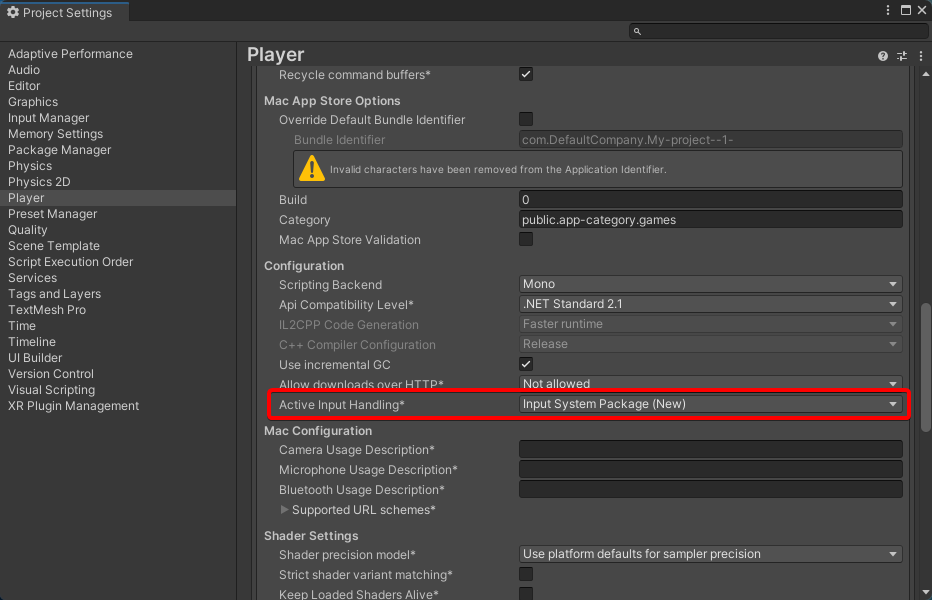
完成 Input System 安裝後,請進入 Project Settings > Player > Other Settings > Configuration,調整 Active Input Handling 的設定值為 Input System Package (New) 來啟用 Input System。
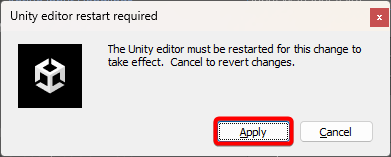
最後編輯器會提示開發者需要重新啟動 Unity 編輯器來讓設定生效,請點擊 Apply 進行重啟。
連接 HID 輸入裝置
本文將以目前 Input System 尚未內建支援的 Griffin PowerMate 作為範例,進行 Input System 的「自訂 HID 裝置」實作。
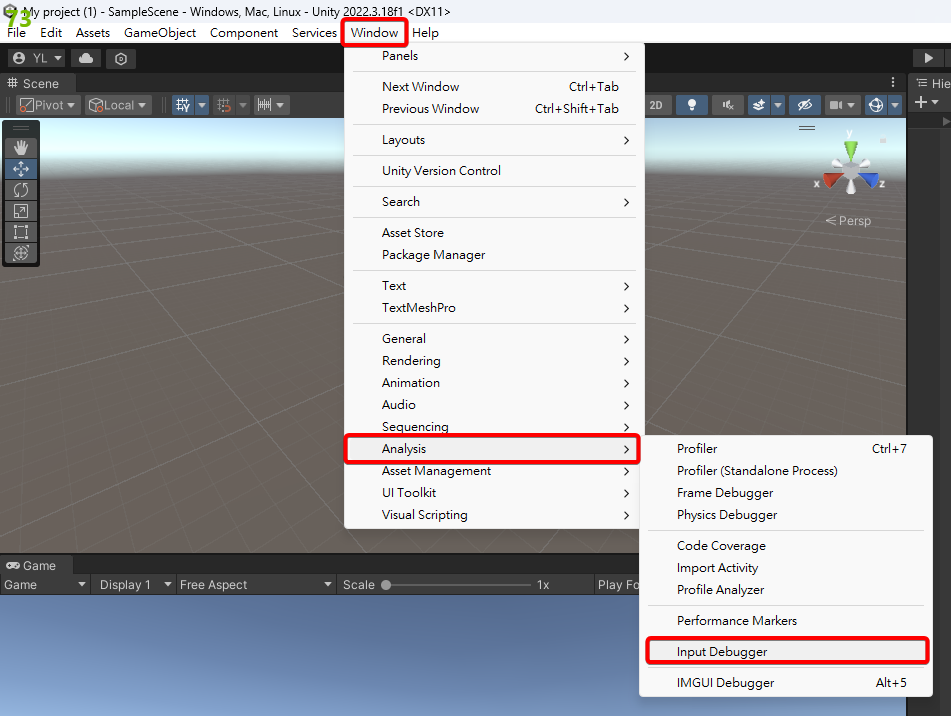
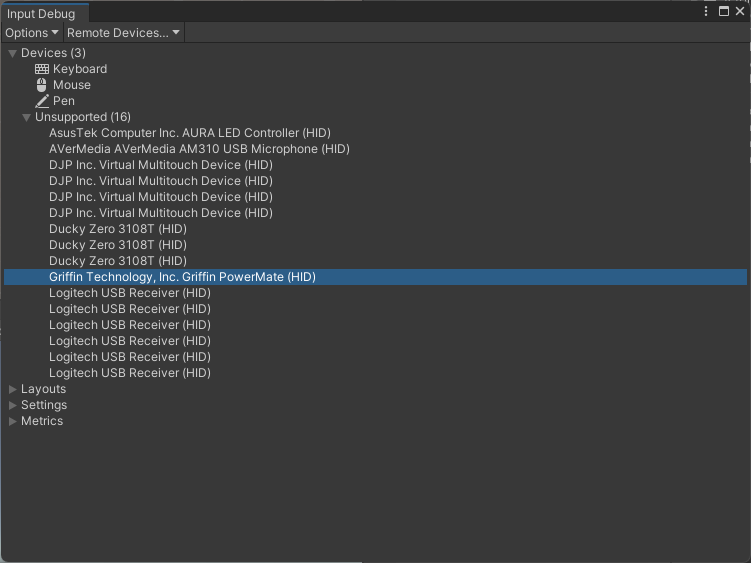
請先連接 Griffin PowerMate 至電腦,再進入 Windows > Analysis > Input Debugger 查看目前已連接的輸入裝置。
如 Griffin PowerMate 已成功連接至電腦,Input Debugger 的 Devices > Unsupported 中將出現「Griffin Technology, Inc. Griffin PowerMate (HID)」。
取得 HID 裝置規格
為了能順利開發,開發者需要取得 HID 裝置的規格和封包結構的說明,這關係到後續要如何讓 Input System 解讀 HID 裝置輸入的資訊。
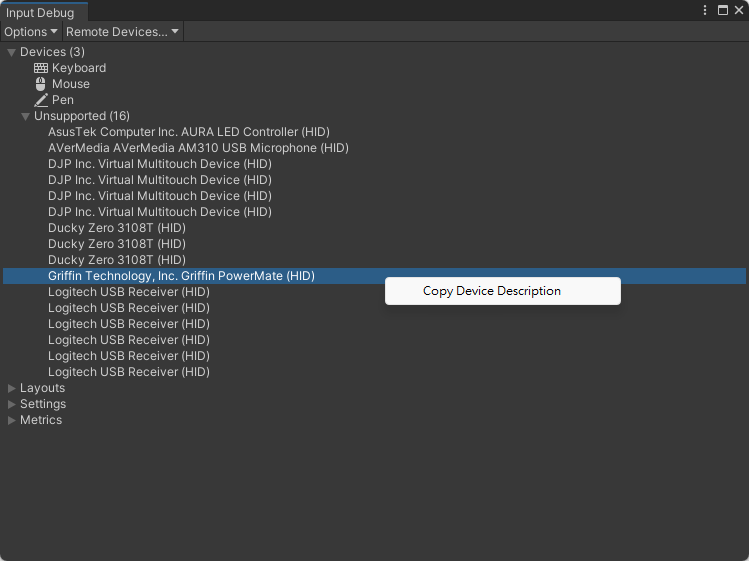
首先是規格,以 Griffin PowerMate 為例,請在 Unsupported 中的「Griffin Technology, Inc. Griffin PowerMate (HID)」上面點擊右鍵 > Copy Device Description 複製裝置描述資訊,並貼上至記事本或任何的文字編輯器。
最後得到的裝置描述資訊會與下圖類似,開發者需先紀錄 interface 和 product 兩個欄位的內容,這些資訊將攸關 Input System 是否能正確辨識裝置。
1{
2    "interface": "HID",
3    "type": "",
4    "product": "Griffin PowerMate",
5    "serial": "",
6    "version": "1024",
7    "manufacturer": "Griffin Technology, Inc.",
8    "capabilities": "..."
9}
其次是要取得含有封包結構的說明,Griffin PowerMate 於 GitHub 上已有官方的 SDK,其中 Original Windows API.zip 檔案中的 PM Protocol v2.pdf 即記載了封包的結構。
- GitHub 連結:https://github.com/zorbathut/powermate
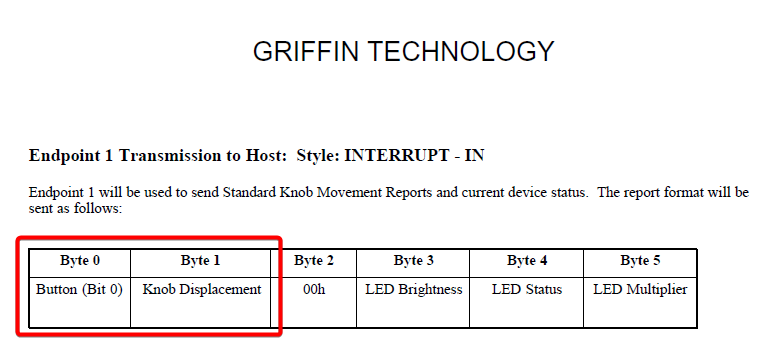
在 PM Protocol v2.pdf 文件的第三頁中,說明了此裝置會傳入那些資訊與對應的封包範圍,本文接下來將以 Griffin PowerMate 的按壓和旋轉輸入為主軸,說明要如何讀取封包資訊。
建立 HID 封包結構
於 Unity 專案中新增一個 struct 腳本,命名為 PowerMateReport,這個腳本主要是要告知 Input System 開發者將整合的 HID 裝置的封包結構。
首先請於 PowerMateReport 結構前加入 StructLayout(LayoutKind.Explicit) 以手動設置欄位於記憶體中的位置,再實作 IInputStateTypeInfo 介面,於 format 定義封包的格式,需和紀錄的 interface 一致。
1[StructLayout(LayoutKind.Explicit)]
2public struct PowerMateReport : IInputStateTypeInfo
3{
4    public FourCC format => new ('H', 'I', 'D');
5}
接下來是定義 Griffin PowerMate 的按壓和旋轉的封包位置,分別定義 button(按鈕)和 knobDisplacement(旋轉)欄位,類型皆為 byte。
PM Protocol v2.pdf 文件中有寫到,按鈕的封包位置在第 0、旋轉在第 1 個 byte,但 HID 裝置傳入的第一個封包通常是 Report ID,所以真正記載按鈕和旋轉的封包位置是第 1 和第 2 個 byte。分別在 button 和 knobDisplacement 上加上 FieldOffset 指定封包位置。
 1[StructLayout(LayoutKind.Explicit)]
 2public struct PowerMateReport : IInputStateTypeInfo
 3{
 4    public FourCC format => new ('H', 'I', 'D');
 5
 6    [FieldOffset(1)]
 7    public byte button;
 8
 9    [FieldOffset(2)]
10    public byte knobDisplacement;
11}
最後於 button 和 knobDisplacement 上加上 InputControl,定義 name、layout、format 和 bit 屬性。name 可隨意命名、layout 需對應 InputSystem.Controls 的名稱、format 固定為 BYTE、bit 則要參考封包結構的說明書。
以 Griffin PowerMate 為例,輸入的資訊都可以轉為整數,所以都設定 layout 為 Integer;記載按鈕狀態的封包位置在第 2 個 byte 的第 1 個 bit,所以設定 button 的 bit 為 0。
 1[StructLayout(LayoutKind.Explicit)]
 2public struct PowerMateReport : IInputStateTypeInfo
 3{
 4    public FourCC format => new ('H', 'I', 'D');
 5
 6    [FieldOffset(1)]
 7    [InputControl(name = "Button", layout = "Integer", format = "BYTE", bit = 0)]
 8    public byte button;
 9
10    [FieldOffset(2)]
11    [InputControl(name = "KnobDisplacement", layout = "Integer", format = "BYTE")]
12    public byte knobDisplacement;
13}
建立 HID 裝置類別
開發者建立好能讓 Input System 解析 HID 封包的結構後,即可正式將 HID 裝置整合至 Input System。於 Unity 專案中新增一個 class 腳本,命名為 PowerMateDevice,繼承 InputDevice 類別,這支檔案的作用是告知 Input System 要整合哪一個 HID 裝置,與這個裝置對應的封包結構是什麼。
首先為 PowerMateDevice 類別加上 InitializeOnLoad 讓腳本能在編輯器中運作,再加上 InputControlLayout 告知 Input System 要使用開發者建立的 PowerMateReport 來解析封包。
1#if UNITY_EDITOR
2[InitializeOnLoad]
3#endif
4[InputControlLayout(stateType = typeof(PowerMateReport))]
5public class PowerMateDevice : InputDevice {}
接下來建立 button 和 knobDisplacement 屬性,類型皆使用 IntegerControl,這對應到 PowerMateReport 中 InputControl 的 layout。
1#if UNITY_EDITOR
2[InitializeOnLoad]
3#endif
4[InputControlLayout(stateType = typeof(PowerMateReport))]
5public class PowerMateDevice : InputDevice
6{
7    public IntegerControl button { get; protected set; }
8    public IntegerControl knobDisplacement { get; protected set; }
9}
重寫 FinishSetup() 並定義 button 和 knobDisplacement 對應的封包,這對應到 PowerMateReport 中 InputControl 的 name。
 1#if UNITY_EDITOR
 2[InitializeOnLoad]
 3#endif
 4[InputControlLayout(stateType = typeof(PowerMateReport))]
 5public class PowerMateDevice : InputDevice
 6{
 7    public IntegerControl button { get; protected set; }
 8    public IntegerControl knobDisplacement { get; protected set; }
 9
10    protected override void FinishSetup()
11    {
12        button = TryGetChildControl<IntegerControl>("Button");
13        knobDisplacement = TryGetChildControl<IntegerControl>("KnobDisplacement");
14    }
15}
新增靜態的 Initialize() 方法,以 InputSystem.RegisterLayout 於 Input System 註冊裝置。為了能讓 Input System 能順利找到裝置,至少需提供 Interface 和 Product 資訊,對應到先前取得裝置規格的內容。
最後於建構式中呼叫 Initialize() 讓它能在編輯器終生效。
 1#if UNITY_EDITOR
 2[InitializeOnLoad]
 3#endif
 4[InputControlLayout(stateType = typeof(PowerMateReport))]
 5public class PowerMateDevice : InputDevice
 6{
 7    public IntegerControl button { get; protected set; }
 8    public IntegerControl knobDisplacement { get; protected set; }
 9
10    static PowerMateDevice()
11    {
12        Initialize();
13    }
14
15    [RuntimeInitializeOnLoadMethod(RuntimeInitializeLoadType.BeforeSceneLoad)]
16    private static void Initialize()
17    {
18        InputSystem.RegisterLayout<PowerMateDevice>(
19            matches: new InputDeviceMatcher()
20                .WithInterface("HID")
21                .WithProduct("Griffin PowerMate"));
22    }
23
24    protected override void FinishSetup()
25    {
26        button = TryGetChildControl<IntegerControl>("Button");
27        knobDisplacement = TryGetChildControl<IntegerControl>("KnobDisplacement");
28    }
29}
測試 HID 裝置輸入
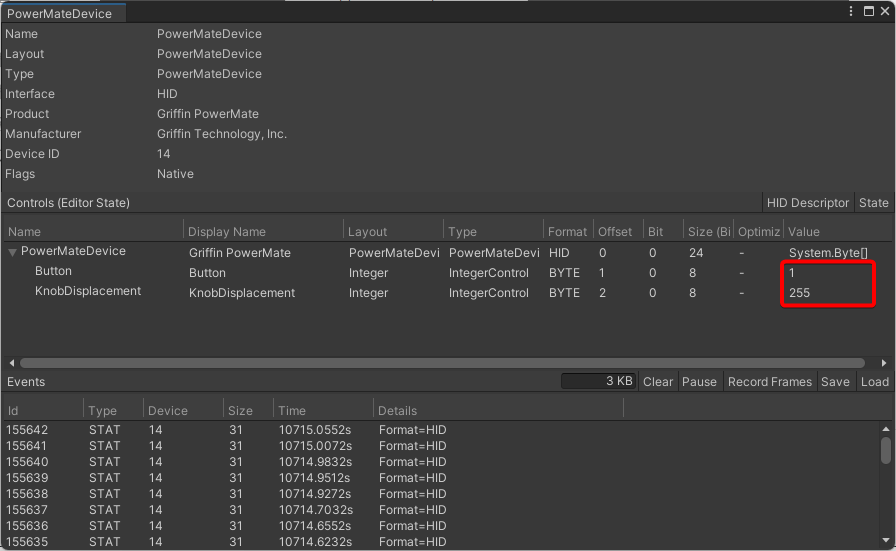
開啟 Input Debugger,應該能在 Devices 中找到 PowerMateDevice,請對它按下右鍵 > Open Device Debug View 開啟測試視窗。

操作一下 Griffin PowerMate,這時按鈕和旋轉的數值應能夠即時的顯示在視窗中。
整合 HID 輸入至遊戲
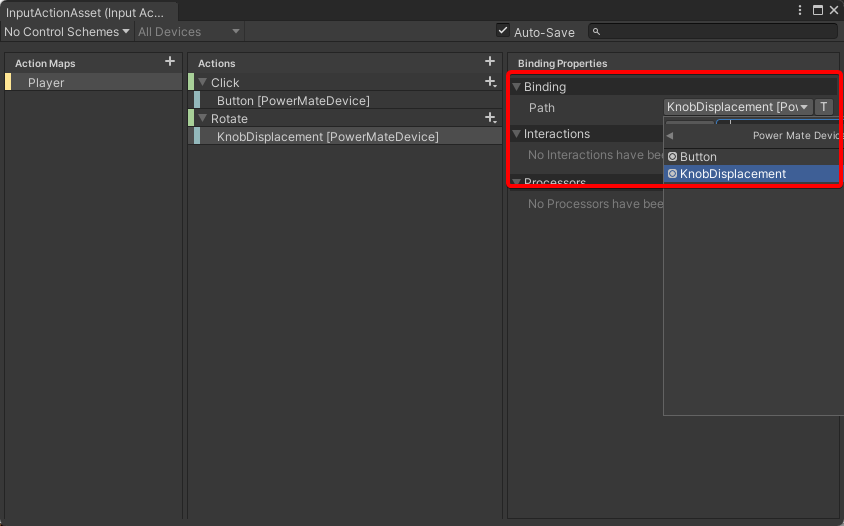
請先於 Unity 專案中建立一個 Input Action Asset,新增一個 Action Map 與兩個 Actions,並調整 Action Type 為 Pass Through、Control Type 為 Integer。Control Type 對應到 PowerMateDevice 腳本內定義 button、knobDisplacement 屬性的類型。

分別定義 Click 和 Rotate 綁定的輸入為 Button 和 KnobDisplacement,路徑都在 Other/Power Mate Device 中。
在場景上建立一個 Cube 物件,並加上 Player Input 組件,設定 Actions 為剛才建立的 Input Action Asset、Behavior 為 Invoke Unity Events。
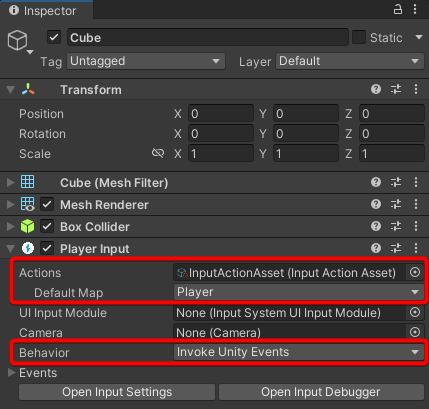
建立一個 CubeController 腳本用於接收輸入事件和控制 Cube 的大小和旋轉,並加入至 Cube 的組件。
 1public class CubeController : MonoBehaviour
 2{
 3    public void OnClick(InputAction.CallbackContext ctx)
 4    {
 5        var button = ctx.ReadValue<int>();
 6        if (button == 1)
 7        {
 8            transform.localScale = Vector3.one * 2;
 9        }
10        else
11        {
12            transform.localScale = Vector3.one;
13        }
14    }
15
16    public void OnRotate(InputAction.CallbackContext ctx)
17    {
18        var rotate = ctx.ReadValue<int>();
19        if (rotate > 128)
20        {
21            rotate -= 256;
22        }
23
24        transform.Rotate(0, 0, -rotate * .01f * 360);
25    }
26}
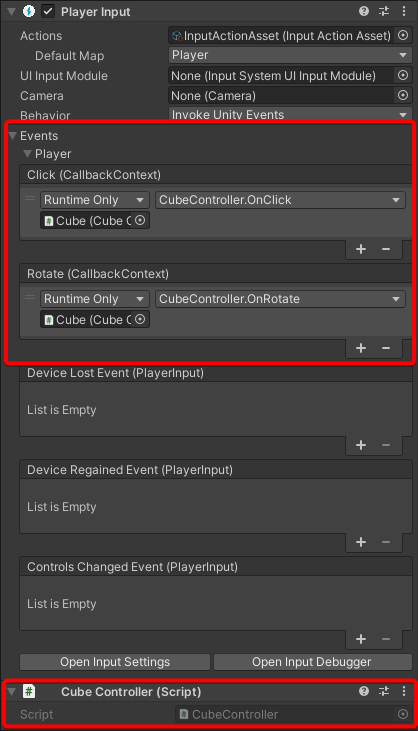
最後於 Player Input 組件的 Events > Player 設定事件與對應的方法。
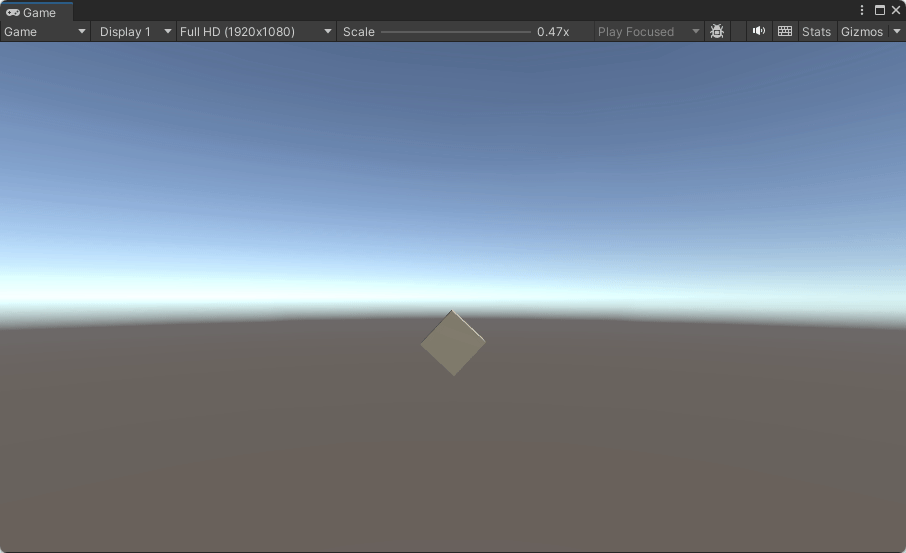
執行遊戲,操作一下 Griffin PowerMate 應能成功操作 Cube 物件。
修正 HID 數值問題
執行測試過後,由於 Griffin PowerMate 旋轉時的數值並非固定 1(順時鐘)和 255(逆時鐘),還會有旋轉距離的變化,轉得快時有可能會出現 2、3、4 或 254、253、252 等數值,且只有在旋轉距離數值有變化時 Input System 才會觸發事件,導致使用者在定速旋轉時會出現 Cube 轉不動的問題。
若開發者遇到這個問題,可於 PowerMateDevice 中實作 IInputStateCallbackReceiver 介面,讓 knobDisplacement 在輸入後的下一次更新重置為 0,這樣就能強制每次更新都能觸發事件,以順利轉動 Cube。
 1#if UNITY_EDITOR
 2[InitializeOnLoad]
 3#endif
 4[InputControlLayout(stateType = typeof(PowerMateReport))]
 5public class PowerMateDevice : InputDevice, IInputStateCallbackReceiver
 6{
 7    public IntegerControl button { get; protected set; }
 8    public IntegerControl knobDisplacement { get; protected set; }
 9
10    static PowerMateDevice()
11    {
12        Initialize();
13    }
14
15    [RuntimeInitializeOnLoadMethod(RuntimeInitializeLoadType.BeforeSceneLoad)]
16    private static void Initialize()
17    {
18        InputSystem.RegisterLayout<PowerMateDevice>(
19            matches: new InputDeviceMatcher()
20                .WithInterface("HID")
21                .WithProduct("Griffin PowerMate"));
22    }
23
24    protected override void FinishSetup()
25    {
26        button = TryGetChildControl<IntegerControl>("Button");
27        knobDisplacement = TryGetChildControl<IntegerControl>("KnobDisplacement");
28    }
29
30    public void OnNextUpdate()
31    {
32        InputState.Change(knobDisplacement, 0);
33    }
34
35    public void OnStateEvent(InputEventPtr eventPtr)
36    {
37        InputState.Change(this, eventPtr);
38    }
39
40    public bool GetStateOffsetForEvent(InputControl control, InputEventPtr eventPtr, ref uint offset)
41    {
42        return false;
43    }
44}
總結
在本文中,開發者已完成解析 HID 裝置的規格到撰寫與修正輸入數值整套流程的整合,未來若有任何 HID 輸入的裝置需整合到 Unity,只要有完整的規格說明書,理論上都能順利的實作。
Input System 作為新一代的 Unity 輸入處理模組,封裝了所有外部輸入的底層邏輯,讓開發者能夠以一個通用的介面來進行實作。目前 Input System 尚未支援 Serial Port 的裝置,若有機會能整合,可更大的減少開發成本,對於互動裝置的設計將會是一個莫大的幫助。
最後,本文的範例專案已於 GitHub 開源,歡迎參考!
本文使用的 Griffin PowerMate 裝置由雲科大 IMDLAB 提供。